HTML5 mobile apps with native UI on Steroids
Recently I attended Front Trends 2014 in Warsaw. This is an awesome conference which you should (no, definitely have to!) attend in 2015. Besides incredible main programm Front Trends provides a set of Lighting Talks. This year I was a part of it presenting Steroids, a framework and a toolkit for developing HTML5 mobile apps. If you did not have a chance to hear it, this offline text presentation is for you.
Being an absolute newbie in developing mobile apps I decided to showcase Steroids because it enables me to create pretty native-looking application and smoothly go through the developing and releasing flow in a few minutes.
The Steroids toolkit is a CLI; it brings Steroids JavaScript framewrok into your project and takes care of building an app, developing flow, debugging and releasing. It is based on NodeJs, so you have to have it installed.
The required version for now is 0.10.25. Follow the Installation and Setup
Guide.
Your very first start would be creating a project using steroids create
command. Then, typing steroids connect --watch in the gotten project
folder launches steroids process. The --watch flag as you can guess tells
Steroids to watch over the file changes, rebuild the app and push the results
to the connected devices.
You can connect a physical smartphone to the project. After running
steroids connect you get a web page with a QR code opened in your browser.
Use AppGyver Scanner to read this QR code, it will bring the application
into your phone and keep it connected.


Another way to watch the app is to bring it into a desktop simulator.
To do this, type simulator in the terminal wich launched
steroids connect.
You can change the application source files. E.g. edit a text
in www/index.html and make sure that the app in the connected device
or in the simulator has been changed.
To provide more powerful changes you can learn from the examples
and tutorials. Run steroids generate command and get the relevant
code.
You can learn from this code examples, from tutorials and API Docs. Below I demonstrated some of the features which enable to use native UI.
Let us start with showing the native tabs.
In the config/application.coffee file you can find a commented
example of defining a list of tabs with their icons and
locations (URLs) they lead to.
In my application I created 3 tabs. They are for
- index.html
- notificationExample.html
- knowledge.html
steroids.config.tabBar.enabled = true
steroids.config.tabBar.tabs = [
  {
    title: "Index"
    icon: "icons/pill@2x.png"
    location: "http://localhost/index.html"
  },
  {
    title: "Notifications"
    icon: "icons/bell.png"
    location: "http://localhost/notificationExample.html"
  },
  {
    title: "Knowledge base"
    icon: "icons/coding.png"
    location: "http://localhost/knowledge.html"
  }
]
Place the pages into www directory and keep them empty yet.
Do not forget the icons. You can borrow the whole icon
folder.
After making the change wait for rebuild and check.

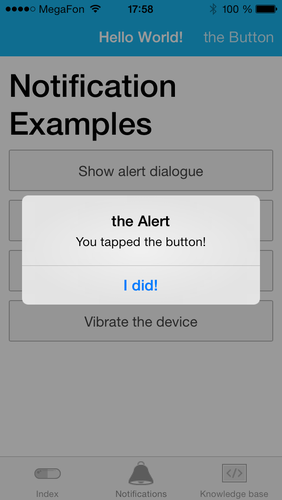
Next, we can play with notifications.
Place these buttons inside the <body> container of the
www/notificationExample.html file.
<button class="button button-block" ontouchend="showAlert()">
  Show alert dialogue
</button>
<button class="button button-block" ontouchend="showConfirm()">
  Show confirm dialogue
</button>
<button class="button button-block" ontouchend="showPrompt()">
  Show prompt dialogue
</button>
<button class="button button-block" ontouchend="vibrate()">
  Vibrate the device
</button>
As you can see, they run different JavaScript functions on
touch. To finish the page you need to define these functions
in the <head> or linked *.js file. Each function demonstrates
a kind of notification which are:
navigator.notification.alertnavigator.notification.confirmnavigator.notification.promptnavigator.notification.vibrate
Borrow the JavaScript code from my repo.
Now you can navigate to this page using the tabs and try each type of notification with tapping.
Another native element could be a button in the application navigation bar.
The navigation bar can be modified with JavaScript on Steroids.
If you want it to be the same across all the application pages,
provide this JavaScript in the www/javascripts/application.js file
which is linked to all the *.html files.
var loginButton = new steroids.buttons.NavigationBarButton();
loginButton.title = "the Button";

loginButton.onTap = function () {
  navigator.notification.alert(
    "You tapped the button!",
    function () {},
    "the Alert",
    "I did!"
  );
};

steroids.view.navigationBar.update({
  buttons: {
    right: [loginButton],
  },
});
This will bring the button to the right side of the navigation bar. Tapping on it you can see a notification; one of those you studied recently.
The last of native UI examples in this app is showing modal views.
Add this button into www/index.html:
<a class="button button-block" ontouchend="showModal()">Open modal</a>And code showModal method to open a view as a modal.
function showModal() {
  var webView = new steroids.views.WebView("/views/modalExample/show.html");
  steroids.modal.show(webView);
}
The related view is a piece of html, which you should place into
app/views/modalExample/show.html. BTW, it has to have an interface
element closing the view. To make the process faster, pick up the
code from the application repo.
With this and other UI features you can build a mobile interface which looks absolutely native for a device where you application runs.
Once finished coding (or even in process) you may need to show the application to your friend, client or Mom.
You can use the QR code from the beginning of our session which can bring your application to any any device directly from your computer. However this only will work if them both are connected to the same network.
If you want to share with someone remotely, deploy your app into the cloud.
The steroids deploy command serves for it. As a result you get
a page (also with a QR code) which can be scanned with AppGyver Scaner on
a phone and thus your pal get the same app from the cloud.
All your applications in the cloud can be shared, tuned and built with web interface at cloud.appgyver.com.
From there you also push the app into AppStore and GooglePlay.

This is easy. As easy that a newbie can develop an app in a few minutes and show you the how-to.
You can learn more about Steroids and Cordova (Steroids is based on PhoneGap) at the AppGyver Academy where you find:
- detailed tutorials,
- documentation,
- big community of devs.
And, of course, you can read this blog. I promise to share my next findings regarding Steroids soon :-)